Published in Articles on by Michiel van Oosterhout ~ 4 min read
As a software developer there have traditionally been two ways of working. Either you start with a bare-bones command-line shell, and use multiple programs in unison, typically a competent command-line text editor like Vim, your intepreter or compiler of choice, and several command-line utilities to, for example, install packages or run automated tests. Or you use a fully integrated development environment (IDE), a single program that combines editor, interpreter/compiler, and many utilities. Visual Studio Code occupies a space somewhere in between. Out of the box it is just a text editor, but through the use of extensions it can be made into something resembling an IDE, where the compiler and other utilities can be run without switching away from the editor.

The Visual Studio Code installer
The Visual Studio Code installer can be downloaded from code.visualstudio.com. It is an Inno Setup installer. We have seen this type of installer before in Installing Git on Windows, so we know the installer is compiled from a setup script file. The file can be found here.
Like Git for Windows, Visual Studio Code can also be installed using Windows Package Manager (a.k.a. winget). The package is based on the same installer (see the package manifest), but using winget is more suitable for unattended automated installation.
We will use similar approach to installing Git for Windows: pass command-line parameters to the installer via winget's --override parameter.
We use /TASKS to select only those tasks we want to be executed by the installer. The task names are defined in the setup script, and correspond to the checkboxes on this page of the installer:
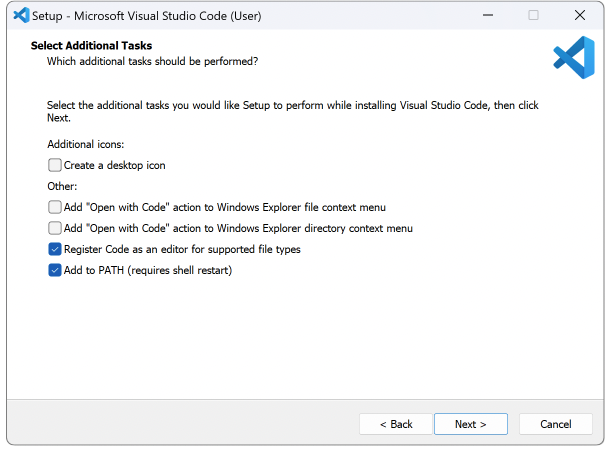
We specifically do not select Register Code as an editor for supported file types
(task associatewithfiles) in our installation script as we may want to use different editors for some of these files.
The installation script
The Windows PowerShell script below uses winget and the --override parameter to install Git for Windows. The application will be installed in $Env:LOCALAPPDATA\Programs\Microsoft VS Code by default.
# Define parameters for the installer
$innoParameters = @{
    ALLUSERS = $false
    VERYSILENT = $true
    SUPPRESSMSGBOXES = $true
    NORESTART = $true
    FORCECLOSEAPPLICATIONS = $true
}
$innoTasks = @(
    "addtopath"
)

# Map parameters to tokens for the command line
$parameters = $innoParameters.GetEnumerator() | ForEach-Object {
    if ($_.Value -is [bool])
    {
        if ($_.Value)
        {
            "/$($_.Key)"
        }
    }
    else
    {
        "/$($_.Key)=\`"$($_.Value)\`""
    }
}
$parameters += "/TASKS=$([string]::Join(",", $innoTasks))"

$override = [string]::Join(" ", $parameters)

# Install Visual Studio Code
Clear-Host
& winget install Microsoft.VisualStudioCode -s winget --accept-source-agreements --override "$override"
The /VERYSILENT parameter ensures that the only output during the installation is the output on stdout:

winget
Configuring Visual Studio Code
Settings
Visual Studio Code stores settings in a JSON file in %APPDATA%. The Windows PowerShell script below defines an object representing the Visual Studio code settings, and saves it as a JSON file. The settings used in this script (e.g. $settings) are for illustrative purposes only, adjust them as you see fit.
# Define settings
$settings = @{
    "telemetry.telemetryLevel" = "off" # No crash reports, no error telemetry, no usage data
    "window.titleBarStyle" = "native"
    "workbench.startupEditor" = "none"
    "workbench.welcomePage.walkthroughs.openOnInstall" = $false # Does not apply to VS Code's own walkthrough :(
}

# Ensure the settings directory exists
$settingsDirectoryPath = "$Env:APPDATA\Code\User\"
if (-not (Test-Path -Path $settingsDirectoryPath))
{
    $_ = New-Item -Force -ItemType Directory -Path $settingsDirectoryPath
}

# Ensure the settings file exists
$settingsFilePath = "$settingsDirectoryPath\settings.json"
if (-not (Test-Path -Path $settingsFilePath))
{
    $_ = New-Item -Force -ItemType File -Path $settingsFilePath
}

# Replace the settings.json file
$json = ConvertTo-Json $settings
Set-Content -Path $settingsFilePath -Value $json
The $settings variable mirrors the mostly 'flat' structure of Visual Studio Code's settings.json file, and the script above just converts it to JSON before writing it to the file.
Windows Registry
The installer adds the key HKEY_CLASSES_ROOT\VSCodeSourceFile\shell\open\command to the Windows Registry, which adds Visual Studio Code as one of the options to open any type of file:

When the associatewithfiles task is specified the installer will add a lot (100+) of file type associations for Visual Studio Code, but I generally prefer to opt-in to those on a case-by-case basis.
Summary
Visual Studio Code can easily be installed using a winget package, and what's more, its settings are stored as a simple JSON file, making it trivial to automate the configuration as well.
Updates
- Added explanation for why Visual Studio Code is becomes an option to open any type of file.